Make a movie from an image stack or time-lapse in ImageJ (AVI, GIF, MP4)
Turn a folder of frames or a time-lapse stack into an AVI, GIF or MP4 in ImageJ: Image Sequence, a time stamp, a scale bar, frame rate, and saving.
Contents
To make a movie in ImageJ, open your stack (or a folder of frames with File › Import › Image Sequence…), add a time stamp with Image › Stacks › Label… and a scale bar with Analyze › Tools › Scale Bar…, then choose File › Save As › AVI… with JPEG compression and a frame rate such as 10 fps, or File › Save As › Gif… for an animated GIF. ImageJ 1.x cannot write MP4: use Fiji's FFmpeg exporter or convert the AVI with ffmpeg.
This page goes through it with a screenshot of each step in ImageJ 1.54f, from a folder of 60 frames to a finished AVI, GIF and MP4, with the file sizes we got.
What you need: ImageJ 1.x or Fiji. A stack or a folder of frames; we use a synthetic time-lapse (generated: particles moving along a filament, 60 frames 0.5 s apart, 384 × 256 pixels, 16-bit, 0.16 µm per pixel), saved as 60 TIFF files. About 15 minutes.
Make a movie, step by step
Step 1: Import the frames as one stack
If your time-lapse is already one stack file, open it with File › Open… and go to Step 2. If it is a folder of single images (frame_000.tif, frame_001.tif …), choose File › Import › Image Sequence…. Type or Browse to the folder in Dir, keep Sort names numerically ticked, and click OK.
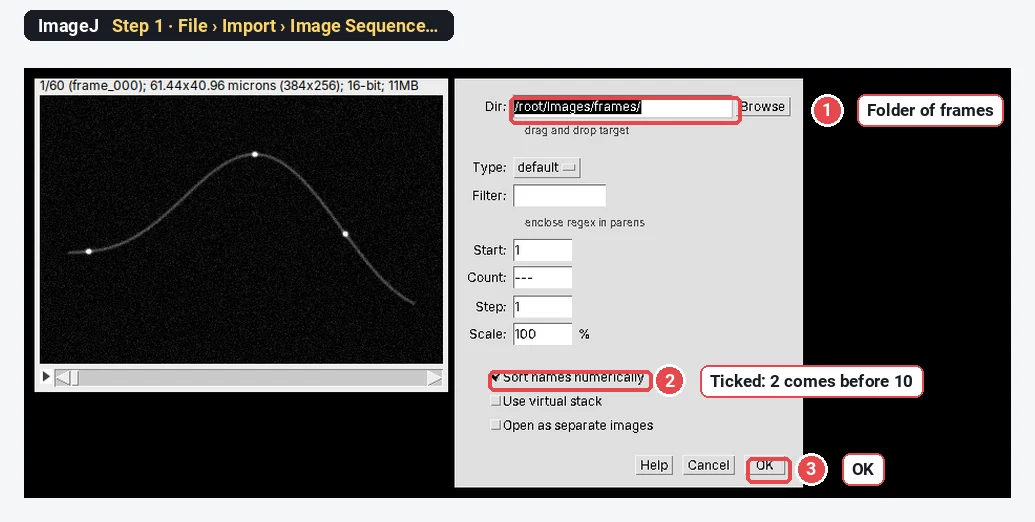
Filter opens only files whose names contain some text (for example "c1" for one channel); Start, Count and Step open part of the sequence or every n-th frame; Use virtual stack reads frames from disk as you need them, for sequences too large for memory. To go the other way, from a stack to a folder of images, use File › Save As › Image Sequence….
Step 2: Tell ImageJ it is a time-lapse
An image sequence opens as a plain stack: ImageJ counts the frames as Z slices and does not know the time between them. Choose Image › Properties… (Ctrl Shift P). Type 1 in Slices (z) and the number of images in Frames (t), check Pixel width, and type the Frame interval (0.5 sec here). Click OK.
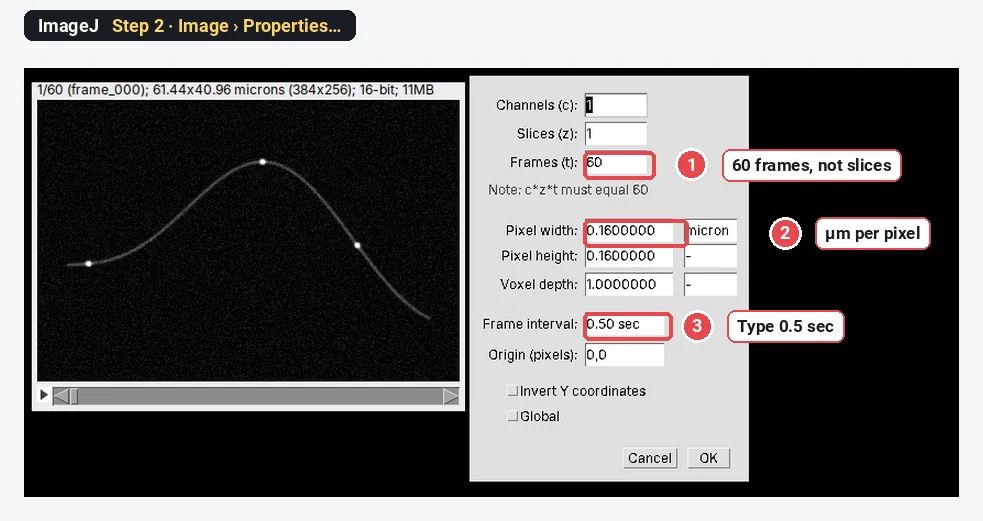
The pixel size came in with the frames because ImageJ had saved them; frames from other software may open in pixels, and then you type the pixel width here too.
Step 3: Add a time stamp with Image › Stacks › Label…
Choose Image › Stacks › Label…. Leave Format on 0 and Starting value on 0, type your frame interval in Interval (0.5), type s in Text, and tick Use overlay so the time is drawn on top of the image instead of into its pixels. Set X location, Y location and Font size to place it (we used 8, 24 and 20). Click OK.
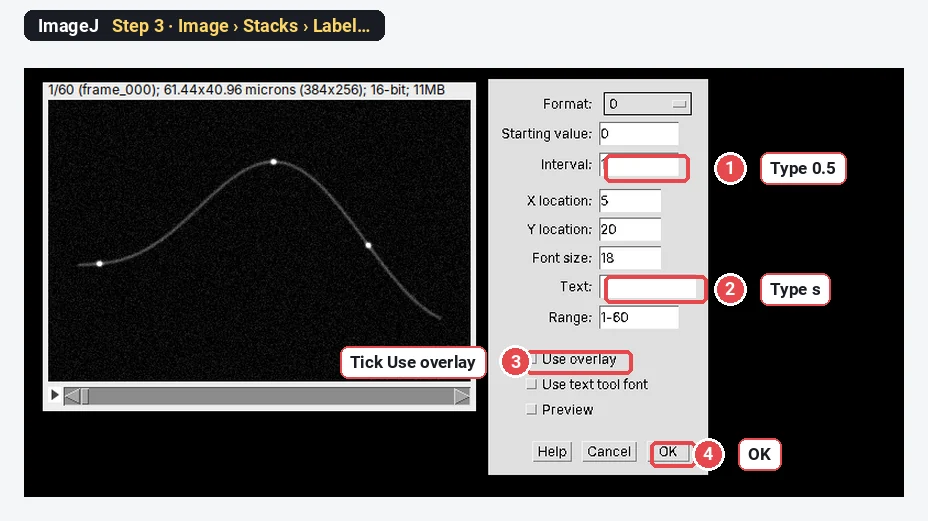
The Format list also has 00:00 (minutes and seconds) and 00:00:00 for long time-lapses, Text for a fixed caption, and Label to print each slice's label. Plain ImageJ 1.54f has no command called Time Stamper: Label is the Time Stamper plugin built into ImageJ since version 1.43. Fiji also lists Image › Stacks › Time Stamper, with similar settings (start, interval, decimal places, unit).
Step 4: Add a scale bar to every frame
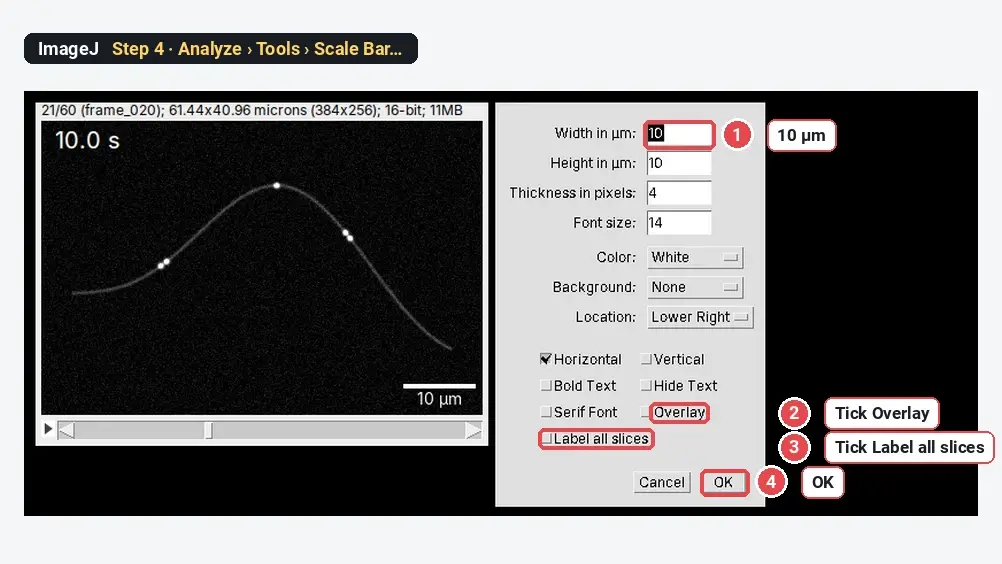
Choose Analyze › Tools › Scale Bar…. Set the Width in µm (10 here), tick Overlay and Label all slices, and click OK. Without Label all slices, the bar appears on the current frame only.
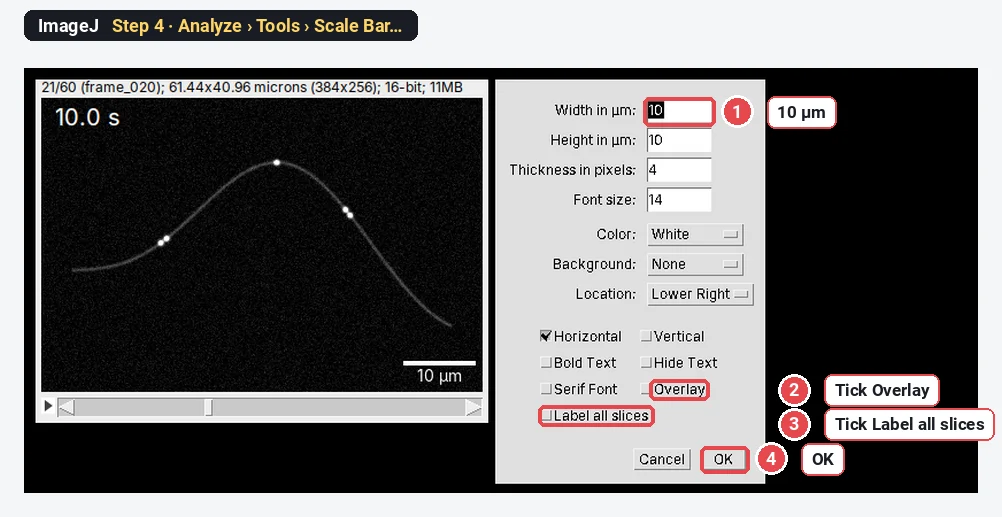
Step 5: Set the frame rate and play it
Choose Image › Stacks › Animation › Animation Options…. Type the Speed in frames per second (10 here) and keep Start Animation ticked to play it at once. ImageJ remembers this speed and offers it when you save. Press \ to start or stop the animation later.
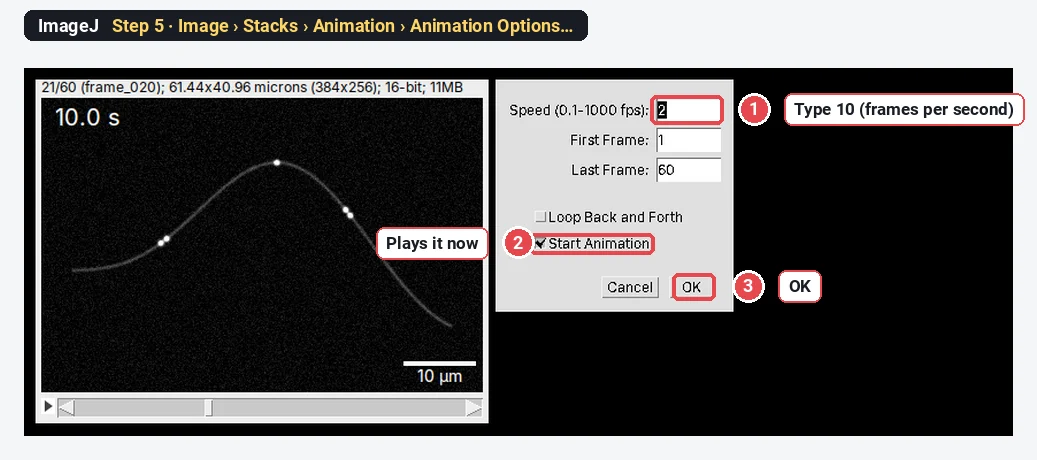
The frame rate is a viewing choice, not data: 60 frames at 10 fps play in 6 seconds and show 30 seconds of real time. The time stamp tells the viewer the real time.
Step 6: File › Save As › AVI…
Choose File › Save As › AVI…. Pick the Compression and the Frame Rate (it shows the speed from Step 5), click OK, then give the file a name.
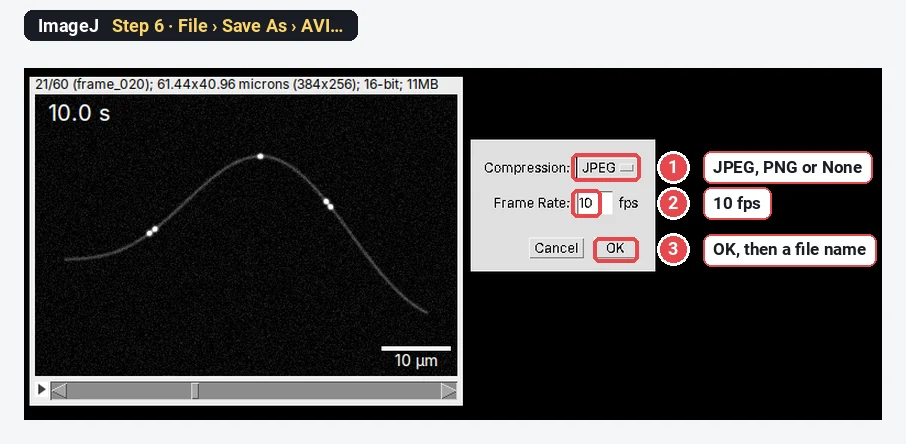
Here is what each choice gave on our 60-frame movie:
| Saved as | Size | Codec | Notes |
|---|---|---|---|
| AVI, JPEG compression | 1.05 MB | Motion JPEG | Small; plays almost everywhere; lossy |
| AVI, PNG compression | 6.06 MB | PNG frames | Lossless; fewer players open it |
| AVI, no compression (None) | 17.7 MB | Raw frames | Lossless; large |
| Animated GIF | 4.07 MB | GIF, 10 fps | Loops in browsers and slides; 256 colours |
| MP4 (ffmpeg from the JPEG AVI) | 0.70 MB | H.264 | Smallest; plays everywhere |
All five are 384 × 256 pixels, 60 frames at 10 fps, and the time stamp and scale bar are burned into every frame: ImageJ draws the overlay into the movie, so you do not have to flatten it first. The 16-bit stack is written as 8-bit using the current display range, so set Brightness/Contrast (Image › Adjust › Brightness/Contrast…) before saving. The stack itself is not changed.
These are four frames of the saved AVI, read back from the file:

Animated GIF: File › Save As › Gif…
With the stack selected, File › Save As › Gif… saves all frames as one animated GIF, at the speed set in Animation Options (our GIF plays at 10 fps). GIFs loop on their own in web pages, email and most slide software. They hold 256 grey levels or colours, which is fine for a single grey channel but can band in smooth colour images.
How do I save a movie as MP4 from ImageJ?
ImageJ 1.x has no MP4 writer. Two ways that work:
- Fiji with FFmpeg. In Fiji, choose Help › Update…, click Manage update sites, add the update site https://sites.imagej.net/VideoImportExport/ (tick it if it is already listed), apply the changes and restart. Then File › Save As › Export Movie Using FFmpeg… writes MP4 and other formats. The first time, it downloads the libraries it needs and may ask for more restarts. We could not test this in Fiji here; the steps are from the plugin's documentation on imagej.net.
- Convert the AVI. Save a JPEG or uncompressed AVI from ImageJ, then convert it with the free ffmpeg command-line tool:
ffmpeg -i movie.avi -c:v libx264 -pix_fmt yuv420p movie.mp4We ran this on our JPEG AVI: a 0.70 MB H.264 MP4, 384 × 256, 60 frames at 10 fps. -pix_fmt yuv420p makes it play in PowerPoint, browsers and phones. H.264 needs an even width and height; if yours is odd, add -vf "scale=trunc(iw/2)*2:trunc(ih/2)*2". HandBrake, a free program with a window, does the same conversion if you prefer not to use the command line.
Pitfalls
- Frames in the wrong order. Without leading zeros, frame_10 sorts before frame_2 alphabetically. Keep Sort names numerically ticked in Image Sequence, or name frames with leading zeros (frame_002).
- A time stamp that counts slices, not seconds. Label's Interval is the frame interval in your unit. With Interval 1 the stamp counts frames.
- Brightness changing the movie. AVI and GIF use the display range. Set it once on a representative frame; do not use Auto on every frame.
- The scale bar on one frame only. Tick Label all slices in the Scale Bar dialog.
- Huge files. Uncompressed AVI took about 3 MB per second of playback for this small movie; use JPEG AVI or MP4 for slides and email, and keep the TIFF stack as your data.
- Measuring from the movie. AVI, GIF and MP4 are 8-bit, compressed or both. Measure the original stack.
Reporting it
Supplementary Movie 1: time-lapse of particle transport along a filament, 60 frames acquired 0.5 s apart, shown at 10 frames per second (5× real time). Time stamp and 10 µm scale bar added in ImageJ 1.54f (Image › Stacks › Label, Analyze › Tools › Scale Bar); exported as AVI (JPEG compression) and converted to MP4 (H.264) with ffmpeg.
Switch to LabCanvas: play and measure the time-lapse in the browser
LabCanvas Image Analysis opens the same TIFF time-lapse in the browser and plays it, with nothing to install, but it does not export video files: for an AVI, GIF or MP4, use ImageJ as above.
- Open the stack (TIFF, OME-TIFF or a hyperstack keep the pixel size and frame interval).
- Image › Stack and image › Player: Play and Pause, a frame rate you set, and Loop.
- Measure the motion: the Kymograph and Tracking assays in the Assays tab, with sample data to try.
- Add to a figure places the current frame with its scale bar; several frames side by side make a time series panel.
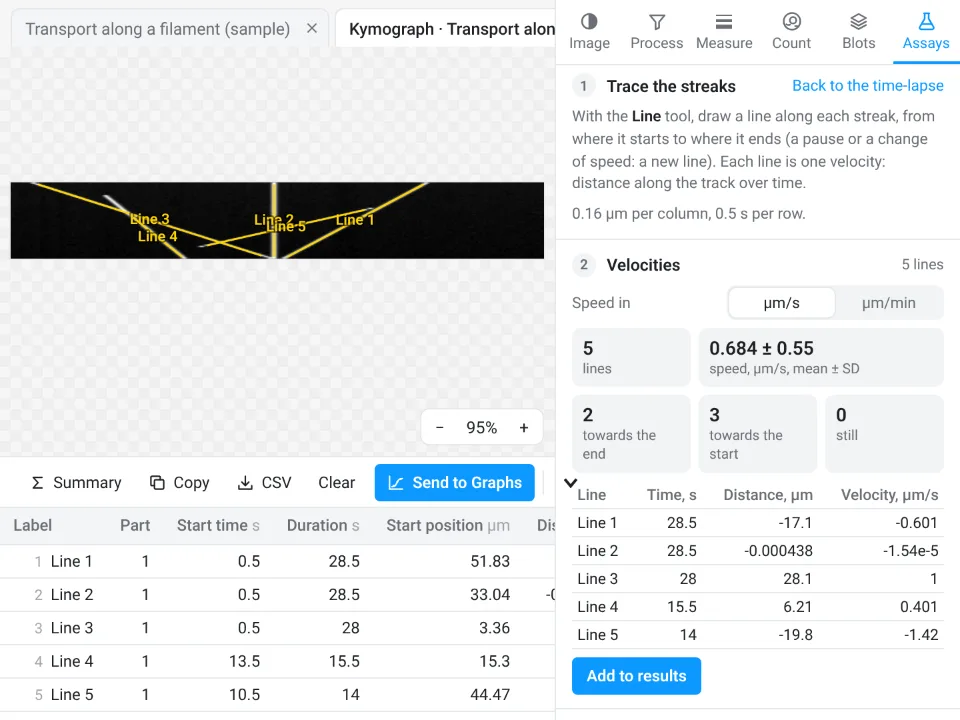
The kymograph above is the same synthetic filament time-lapse as this tutorial, measured in the Kymograph assay.
Why switch for this job:
- Playback and measurement in one place: the time-lapse you play is the one you measure, in µm and seconds from the file.
- Guided assays for kymographs and tracking instead of plugins.
- Frames into a figure with their scale bar, for the printed version of the movie.
Open Image Analysis, free with a LabCanvas account (downloading files is part of Pro).
ImageJ and Fiji are independent open-source projects; LabCanvas is not affiliated with them.
References
- Schneider CA, Rasband WS, Eliceiri KW (2012). NIH Image to ImageJ: 25 years of image analysis. Nature Methods 9(7), 671–675. doi:10.1038/nmeth.2089
- Schindelin J, Arganda-Carreras I, Frise E, et al. (2012). Fiji: an open-source platform for biological-image analysis. Nature Methods 9(7), 676–682. doi:10.1038/nmeth.2019
Frequently asked questions
How do I make a video from a stack in ImageJ?
Open the stack (or import a folder of frames with File › Import › Image Sequence), set the frame rate in Image › Stacks › Animation › Animation Options, then choose File › Save As › AVI… and pick JPEG or PNG compression and the frames per second. File › Save As › Gif… saves an animated GIF instead.
Can ImageJ save as MP4?
Plain ImageJ 1.x cannot: it writes AVI (JPEG, PNG or uncompressed) and animated GIF. In Fiji, add the VideoImportExport update site (sites.imagej.net/VideoImportExport) and use File › Save As › Export Movie Using FFmpeg…, or save an AVI and convert it with the free ffmpeg tool: ffmpeg -i movie.avi -c:v libx264 -pix_fmt yuv420p movie.mp4.
How do I open an image sequence in ImageJ?
Put the frames in one folder, choose File › Import › Image Sequence…, set Dir to that folder, keep Sort names numerically ticked, and click OK. All the images open as one stack, in file-name order. Use Filter to open only names that contain some text, and Start, Count and Step to open part of the sequence.
How do I add a time stamp to a time-lapse in ImageJ?
Use Image › Stacks › Label…: Format 0, Starting value 0, Interval equal to your frame interval (for example 0.5), Text "s", and tick Use overlay. Each frame gets its own time. Fiji also has Image › Stacks › Time Stamper. The labels are burned into AVI and GIF files when you save.
Why does my AVI play too fast or too slow?
The speed is the Frame Rate you type when saving (frames per second), not the real time between frames. 60 frames saved at 10 fps play in 6 seconds. Choose it so the movie is easy to watch, and put a time stamp on the frames so viewers know the real time.
Can I play a time-lapse without installing ImageJ?
LabCanvas Image Analysis plays stacks in the browser (Image › Stack and image › Player, with a frame rate and loop) and measures them, but it does not export video files. For an AVI, GIF or MP4, use ImageJ or Fiji as shown here.
Try it in LabCanvas
Every app is free to start in your browser. Create an account and begin.
Start Image Analysis free in your browserKeep reading

ImageJ vs LabCanvas Image Analysis: an honest comparison
ImageJ/Fiji or LabCanvas Image Analysis? Six everyday jobs done in both, six newer ones (macros, vendor files, 3D, StarDist, big images) and which to use.

How to use ImageJ: a beginner's tutorial for the 10 everyday jobs (2026)
How to use ImageJ and Fiji: get started, open an image, then 10 everyday jobs (scale, measure, threshold, count, background, blots) with exact menu paths.

How to set the scale and add a scale bar in ImageJ (with a calibration image to practise on)
Set the scale in ImageJ (Analyze › Set Scale) from a micrometer, scale bar or pixel size, add a scale bar, and practise on a free calibration image.