3D projection and 3D viewing in ImageJ (Image › Stacks › 3D Project)
Make a rotating 3D view of a Z-stack with Image › Stacks › 3D Project in ImageJ, set the slice spacing, use Orthogonal Views, or Fiji's 3D Viewer.
Contents
To see a Z-stack in 3D in ImageJ, choose Image › Stacks › 3D Project…, set Slice spacing to your Z step (the voxel depth), the Axis of rotation (Y-Axis turns the stack like a door), Total rotation 360 and Rotation angle increment 10, tick Interpolate, and click OK. ImageJ makes a new stack of 36 views, one every 10°, that plays as a rotating movie. For an interactive view you can turn with the mouse, use Fiji's Plugins › 3D Viewer.
This page walks through 3D Project with a screenshot of each step in ImageJ 1.54f, shows what Interpolate does, adds Orthogonal Views for a quick side view, and explains when Fiji's 3D tools are the better choice.
What you need: ImageJ 1.x or Fiji. A Z-stack with a known pixel size and Z step; we use a synthetic bead stack (generated, 40 beads, 256 × 256 pixels × 15 slices, 0.2 µm pixels, 0.5 µm between slices). About 10 minutes.
What 3D Project does
3D Project looks at the stack from one angle after another. For each view it sends a ray through the stack for every pixel and keeps one value along that ray: the brightest one (Brightest Point, like a maximum projection), the nearest one above a threshold (Nearest Point, which shows surfaces), or the average (Mean Value). Turning the stack a few degrees between views gives a series of frames that, played in a loop, look like the object rotating. It is a rendering for viewing and for movies, not a 3D model you can measure.
Make a rotating 3D projection, step by step
Step 1: Open the Z-stack
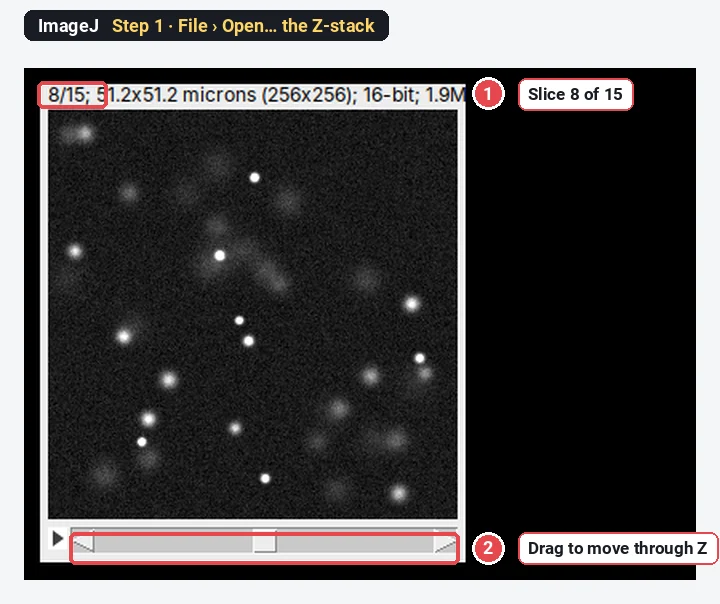
Choose File › Open… and pick the stack. A stack window has a slider under the image; drag it, or use the < and > keys, to move through the slices.
Step 2: Check the voxel depth
Choose Image › Properties… (Ctrl Shift P). Check that Slices (z) is the number of optical sections, and read Pixel width and Voxel depth. Voxel depth is the Z step: the distance between two slices.
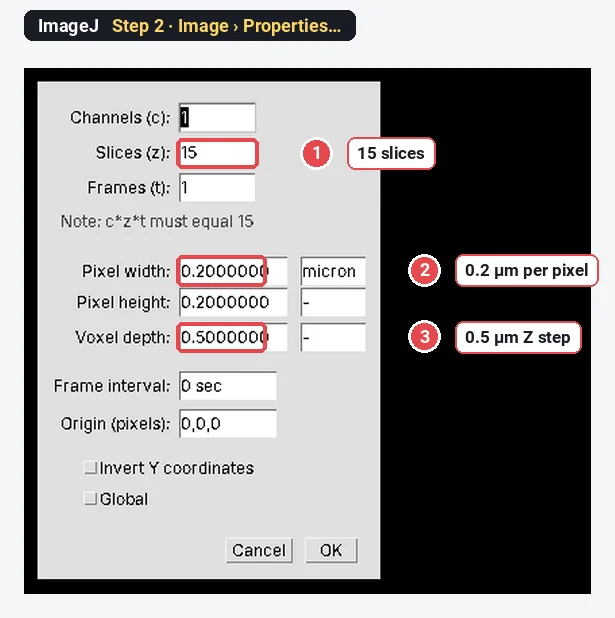
Here one step in Z (0.5 µm) is 2.5 times the pixel size (0.2 µm). If ImageJ assumed 1 instead, the stack would look 2.5 times too deep or too shallow.
Step 3: Fill in Image › Stacks › 3D Project…
Choose Image › Stacks › 3D Project…. Set:
- Projection method: Brightest Point for fluorescence.
- Axis of rotation: Y-Axis (the stack turns left to right like a door). X-Axis tips it forwards; Z-Axis spins it flat on the screen.
- Slice spacing: the voxel depth, 0.5 here. ImageJ fills it in from the stack's properties.
- Initial angle 0, Total rotation 360, Rotation angle increment 10: 36 frames, one every 10°.
- Interpolate: tick it when the slice spacing is bigger than the pixel size.
Leave the transparency bounds (1 and 255), Opacity (0) and the two depth-cueing values (100 and 50) as they are for a first try, and click OK.
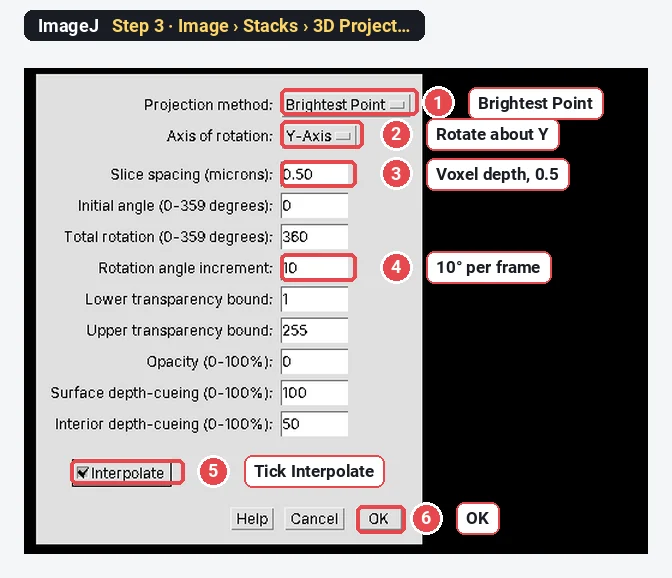
What the other settings do: voxels below the Lower transparency bound or above the Upper one are ignored (raise the lower bound to hide background haze). Opacity blends the nearest surface with the brightest point; it matters for Nearest Point renderings. Depth-cueing makes voxels that are farther away dimmer, so near beads look brighter than far ones; the two values set how strong that is for surfaces and for the interior.
Step 4: Look at the result
ImageJ makes a new window called "Projections of …" with 36 frames. Drag its slider: frame 1 is the stack seen from the front (0°), frame 4 is 30°, frame 10 is 90°.
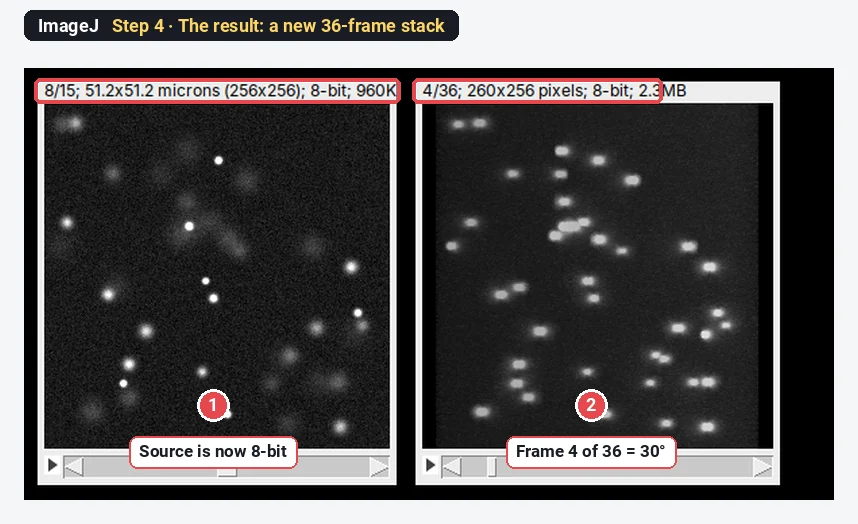
Two things to know about the result:
- The source stack is converted to 8-bit. 3D Project works on 8-bit and RGB images, and in ImageJ 1.54f it converted our 16-bit stack itself to 8-bit, using the display range, without asking. Run it on a copy (Image › Duplicate…, tick Duplicate stack) if you still need the 16-bit values.
- The projection has no scale. The new stack is in pixels, not µm. Add a scale bar to the source, or note the pixel size, before you make a figure.
Step 5: Play it
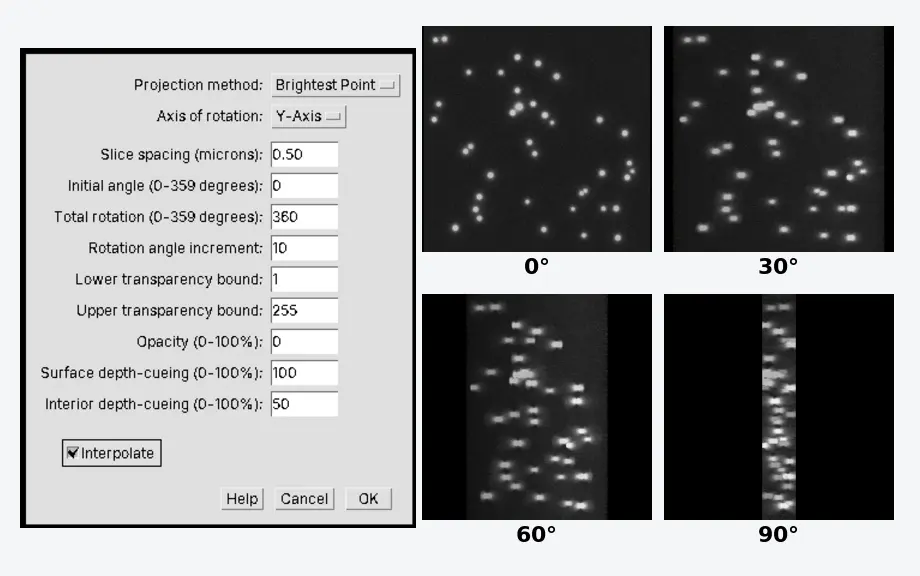
Choose Image › Stacks › Animation › Start Animation (or press \) to play the frames in a loop; click the image or choose Stop Animation to stop. Set the speed in Image › Stacks › Animation › Animation Options… (frames per second). These are the frames ImageJ made, every 30°:

At 90° you see how thin a typical confocal stack is compared with its width (51.2 µm wide, 7.5 µm deep). Each bead also looks longer in depth than across: the microscope's resolution is poorer along Z, and the projection shows that honestly. To save the rotation as a movie, see make a movie from a stack in ImageJ.
Why tick Interpolate?
Without Interpolate, ImageJ draws each slice as a thin plane at its depth and leaves the space between slices empty. When the slice spacing is larger than the pixel size, side views look like a comb. With Interpolate, the gaps are filled by interpolating between neighbouring slices.
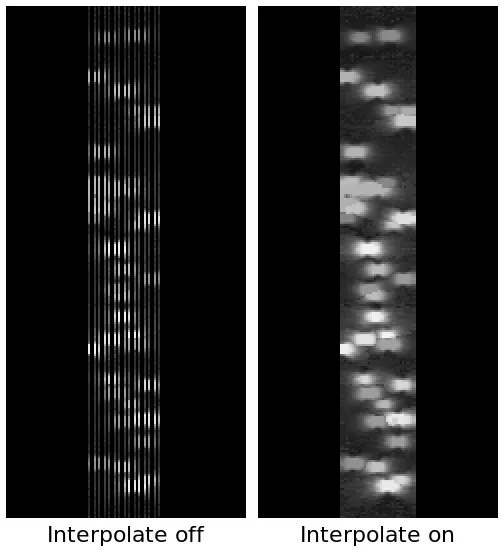
Interpolation makes the picture look continuous; it adds no real information between slices. If you need finer sampling in Z, take smaller Z steps at the microscope.
A quick side view: Orthogonal Views
When you only want to look into the depth of the stack at one point, Image › Stacks › Orthogonal Views (Ctrl Shift H) is faster. It opens two extra panels: XZ (a side view along the horizontal yellow line) and YZ (along the vertical line). Click anywhere in the image to move the crosshair; scroll through the slices as usual.
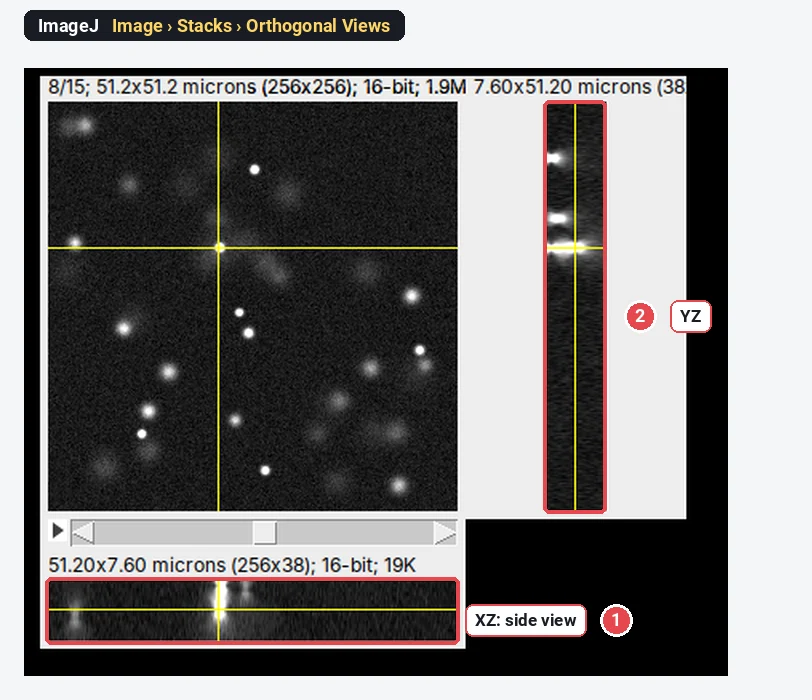
Orthogonal Views uses the voxel depth too, so check Image › Properties first. Image › Stacks › Reslice… (/) makes the same kind of side view along any line you draw, as a new image or stack you can save.
Interactive 3D in Fiji: the 3D Viewer and the 3D ImageJ Suite
These are Fiji tools; we could not run Fiji for screenshots, so the steps are in text only.
3D Viewer (Fiji: Plugins › 3D Viewer) shows a stack in a window you rotate, zoom and slice with the mouse (Schmid et al. 2010). In its dialog, choose the image and Display as: Volume (a semi-transparent rendering), Orthoslice (three planes you move through the stack), Surface (an isosurface at the Threshold you set) or Surface Plot 2D. Set the colour and a Resampling factor (2 or 4 makes large stacks responsive). It reads the voxel size from the image, so the proportions are right if Image › Properties is. View › Record 360 deg rotation makes a rotating movie you can save as a stack. It needs a graphics card with working 3D drivers; on some computers it does not start.
3D ImageJ Suite (enable the "3D ImageJ Suite" update site in Fiji's Help › Update… › Manage update sites) adds 3D filters, 3D segmentation, a 3D ROI Manager and 3D measurements such as volume, surface area and the distances between objects. For counting and measuring objects in 3D, Fiji's Analyze › 3D Objects Counter is the simpler start.
| Tool | Where | What you get | Interactive? |
|---|---|---|---|
| 3D Project | ImageJ and Fiji: Image › Stacks › 3D Project | A stack of rendered views (a movie) | No |
| Orthogonal Views | ImageJ and Fiji: Image › Stacks › Orthogonal Views | XZ and YZ side views through a point | Yes, by clicking |
| Reslice | ImageJ and Fiji: Image › Stacks › Reslice | A side view along a line, as an image | No |
| 3D Viewer | Fiji: Plugins › 3D Viewer | Volume, orthoslices or a surface | Yes, mouse |
| 3D Objects Counter, 3D ImageJ Suite | Fiji (Suite from an update site) | Volumes, surfaces, counts of 3D objects | No (measurements) |
Pitfalls
- A wrong voxel depth. The commonest mistake: files exported without metadata open with a voxel depth of 1 pixel. Type the real Z step in Image › Properties before any 3D view.
- Projecting the only copy. 3D Project turns a 16-bit stack into 8-bit. Duplicate first.
- Measuring on the projection. The frames are renderings with depth-cueing and interpolation. Measure on the original stack.
- Too fine an increment for a big stack. 1° steps over 360° make 360 frames; 10° is usually smooth enough for a movie, and much faster.
- A time-lapse of Z-stacks. Project one time point at a time: Image › Duplicate… with a single frame gives you that Z series.
Reporting it
A rotating view was made in ImageJ 1.54f with Image › Stacks › 3D Project (brightest point, Y axis, 10° steps, slice spacing 0.5 µm, interpolation) from a 15-slice confocal stack (0.2 µm pixels, 0.5 µm steps). The rendering was used for display only; all measurements were made on the original 16-bit stack.
Switch to LabCanvas: Z projection and side views in the browser
LabCanvas has no 3D rendering, so for a rotating 3D view ImageJ (or Fiji's 3D Viewer) is the right tool. What LabCanvas Image Analysis does is the flat and side views most figures and measurements need, in the browser with nothing to install:
- Open the stack (or the Z-stack sample on the start screen; it is the same bead stack used here).
- Image › Stack and image › Z projection: Maximum, Average, Sum, Standard deviation, Minimum or Median, over the slices you choose.
- Image › Stack and image › Orthogonal views: XZ and YZ strips through a point you pick, or XZ as image, YZ as image and Reslice along a line.
- Add to a figure places the projection with its scale bar.
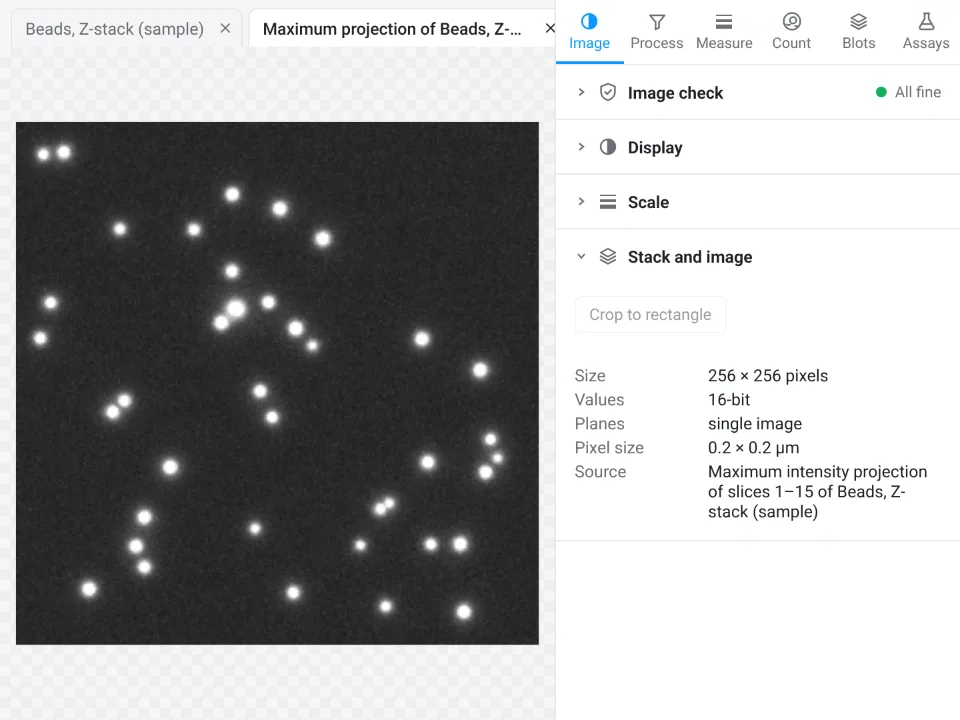
Why switch for this job:
- The image check tells you which slice is sharpest and whether anything is clipped before you project (on this stack: sharpest at slice 8 of 15, nothing clipped).
- The original values stay 16-bit: a projection is a new image, and the stack is never converted.
- Projection straight into a figure, scale bar included.
Open Image Analysis, free with a LabCanvas account (downloading files is part of Pro).
ImageJ and Fiji are independent open-source projects; LabCanvas is not affiliated with them.
References
- Schmid B, Schindelin J, Cardona A, Longair M, Heisenberg M (2010). A high-level 3D visualization API for Java and ImageJ. BMC Bioinformatics 11, 274. doi:10.1186/1471-2105-11-274
- Schindelin J, Arganda-Carreras I, Frise E, et al. (2012). Fiji: an open-source platform for biological-image analysis. Nature Methods 9(7), 676–682. doi:10.1038/nmeth.2019
- Schneider CA, Rasband WS, Eliceiri KW (2012). NIH Image to ImageJ: 25 years of image analysis. Nature Methods 9(7), 671–675. doi:10.1038/nmeth.2089
Frequently asked questions
How do I make a 3D view of a Z-stack in ImageJ?
Open the stack, check the voxel depth in Image › Properties, then choose Image › Stacks › 3D Project…. Pick Brightest Point, an axis of rotation (Y-Axis turns the stack like a door), the slice spacing in µm, a total rotation of 360° and an increment of 10°, tick Interpolate and click OK. ImageJ makes a new stack of 36 views that you play with Image › Stacks › Animation › Start Animation.
Does ImageJ have a 3D viewer?
Plain ImageJ 1.x has 3D Project, which renders a series of fixed views, and Orthogonal Views. Fiji adds the interactive 3D Viewer (Plugins › 3D Viewer), which shows a stack as a volume, orthoslices or a surface that you rotate with the mouse. The 3D ImageJ Suite, from its own update site, adds 3D segmentation and measurement.
What slice spacing should I use in 3D Project?
The real distance between your optical sections, in the same unit as the pixel size: the Z step you set on the microscope, which ImageJ shows as Voxel depth in Image › Properties. With 0.2 µm pixels and 0.5 µm steps, type 0.5. A wrong value squashes or stretches the object in depth.
Why does my 3D projection look striped?
When the slice spacing is larger than the pixel size, each slice is drawn as a thin plane with gaps between them, so side views look like a comb. Tick Interpolate in the 3D Project dialog: ImageJ fills the gaps by interpolating between slices.
Is 3D Project a 3D reconstruction?
It is a rendering: views of the stack from different angles, made by projecting rays through it. It does not build surfaces or measure volumes. For volumes and 3D objects, use Fiji's 3D Objects Counter or the 3D ImageJ Suite; for a surface you can turn and export, the 3D Viewer in Fiji.
Can I view a Z-stack in 3D without installing anything?
LabCanvas Image Analysis shows Z projections and orthogonal views of a stack in the browser, but it has no 3D rendering. For a rotating 3D view, ImageJ or Fiji is the right tool.
Try it in LabCanvas
Every app is free to start in your browser. Create an account and begin.
Start Image Analysis free in your browserKeep reading

ImageJ vs LabCanvas Image Analysis: an honest comparison
ImageJ/Fiji or LabCanvas Image Analysis? Six everyday jobs done in both, six newer ones (macros, vendor files, 3D, StarDist, big images) and which to use.

How to use ImageJ: a beginner's tutorial for the 10 everyday jobs (2026)
How to use ImageJ and Fiji: get started, open an image, then 10 everyday jobs (scale, measure, threshold, count, background, blots) with exact menu paths.

How to set the scale and add a scale bar in ImageJ (with a calibration image to practise on)
Set the scale in ImageJ (Analyze › Set Scale) from a micrometer, scale bar or pixel size, add a scale bar, and practise on a free calibration image.