ImageJ macros for beginners: record a macro and batch-process a folder
Record an ImageJ macro with Plugins › Macros › Record, run it from the editor, then batch-process a folder with Process › Batch › Macro. Step by step.
Contents
To make an ImageJ macro without writing code, choose Plugins › Macros › Record…, do your analysis once with the normal menus, then click Create in the Recorder: the commands you used appear as macro lines in the editor, and Run (Ctrl R) repeats them. To run the same macro on a whole folder, choose Process › Batch › Macro…, set the input and output folders, paste the lines without the open() line and click Process; ImageJ opens every file in turn and the Summary table gets one row per image.
This page shows each step with a screenshot of ImageJ 1.54f: we record a short nuclei count (threshold, clean-up, Analyze Particles), turn it into a macro, run it, and then run it over a folder of three images.
What you need: ImageJ 1.x or Fiji (the steps are the same in both). An image of bright objects on a dark background; we use our synthetic nuclei sample (a generated image with 70 nuclei, 512 × 512 pixels, 16-bit, 0.325 µm per pixel). About 15 minutes.
What is an ImageJ macro?
A macro is a text file of ImageJ commands that runs them in order, the same way every time. It is written in the ImageJ macro language, a small scripting language built into ImageJ; files end in .ijm. Most lines look like this:
run("Watershed");
run("Analyze Particles...", "size=7-Infinity show=Outlines display summarize");
The first part is the menu command's name; the second holds the dialog settings you chose. You rarely need to type these yourself: the Recorder writes them while you click.
Record a macro, step by step
Step 1: Open the Recorder
Choose Plugins › Macros › Record…. A window called Recorder opens with an empty text area. Leave Record: on Macro. You can type a name such as Count_Nuclei.ijm in Name; the Create button is for the end.
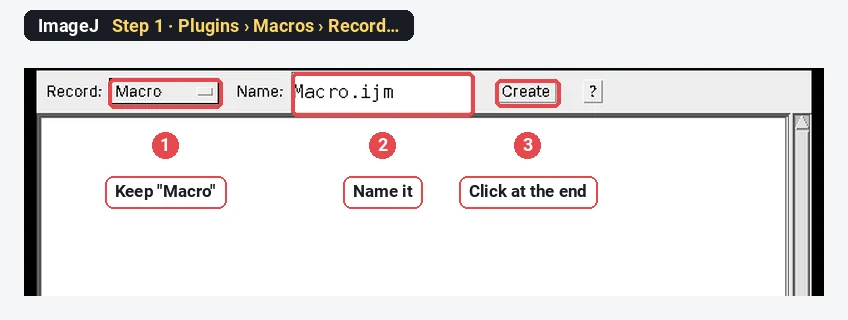
Keep the Recorder open for the whole job. Everything you do from now on is written into it, including mistakes, which you can delete later.
Step 2: Open the image
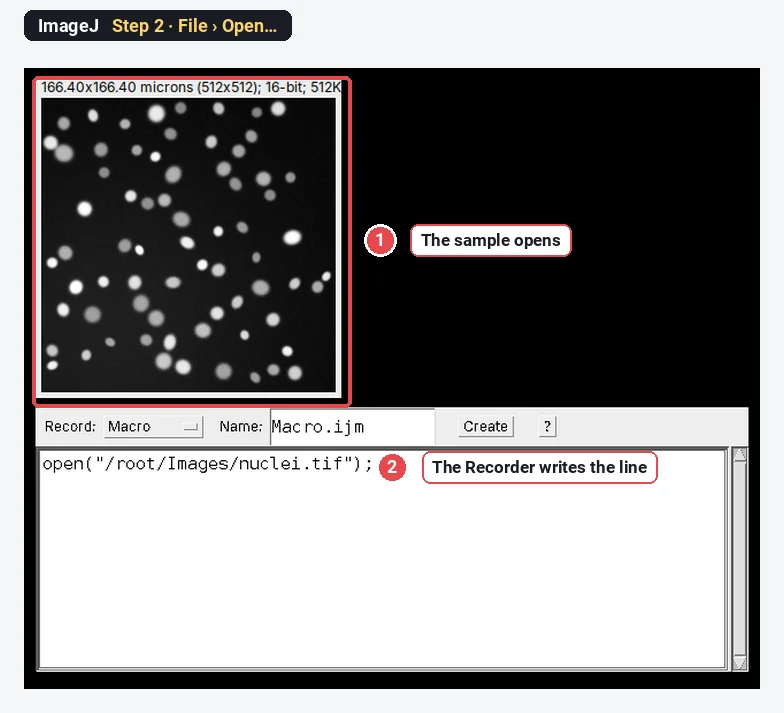
Choose File › Open… and pick your image. The Recorder writes an open() line with the full path of the file.
Step 3: Threshold the nuclei
Choose Image › Adjust › Threshold…. Pick Otsu in the left list, tick Dark background (the nuclei are brighter than the background) and click Apply. The nuclei turn red first, then the image becomes a black-and-white mask.
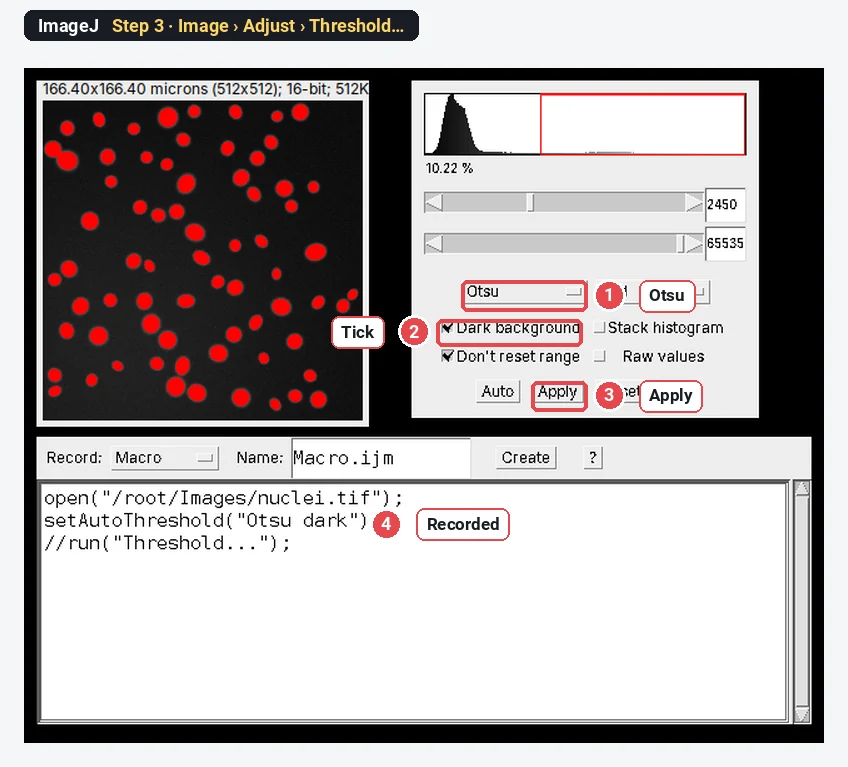
When you click Apply, ImageJ records two more lines: setOption("BlackBackground", true); and run("Convert to Mask");.
Step 4: Clean up the mask
Choose Process › Binary › Fill Holes, then Process › Binary › Watershed. Fill Holes closes any dark gaps inside a nucleus; Watershed cuts touching nuclei apart with a one-pixel line.
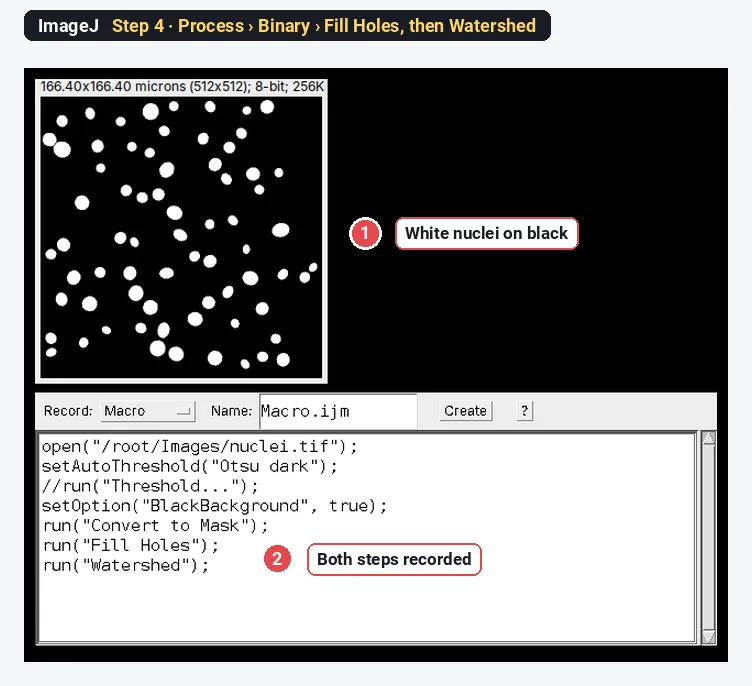
Step 5: Count with Analyze Particles
Choose Analyze › Analyze Particles…. Type 7-Infinity in Size (micron^2) to ignore specks smaller than 7 µm², set Show to Outlines, tick Display results and Summarize, and click OK.
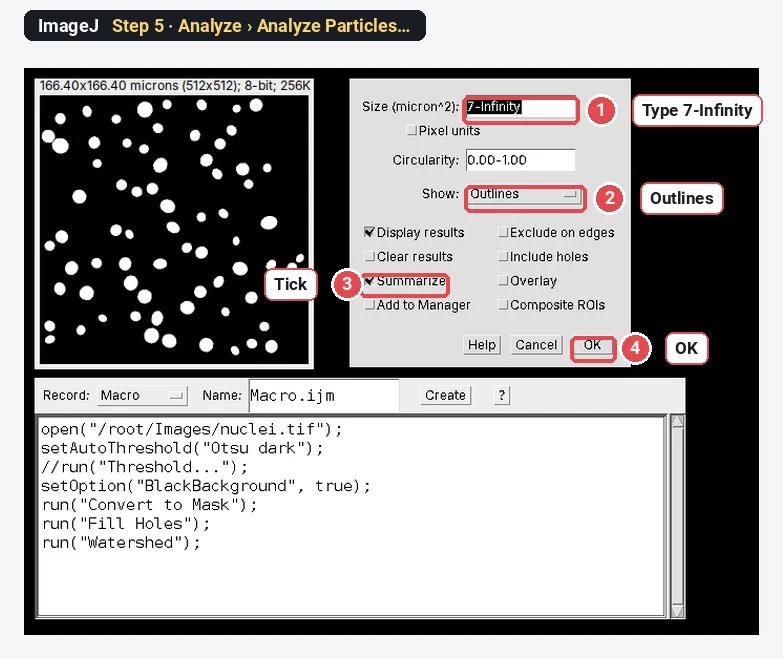
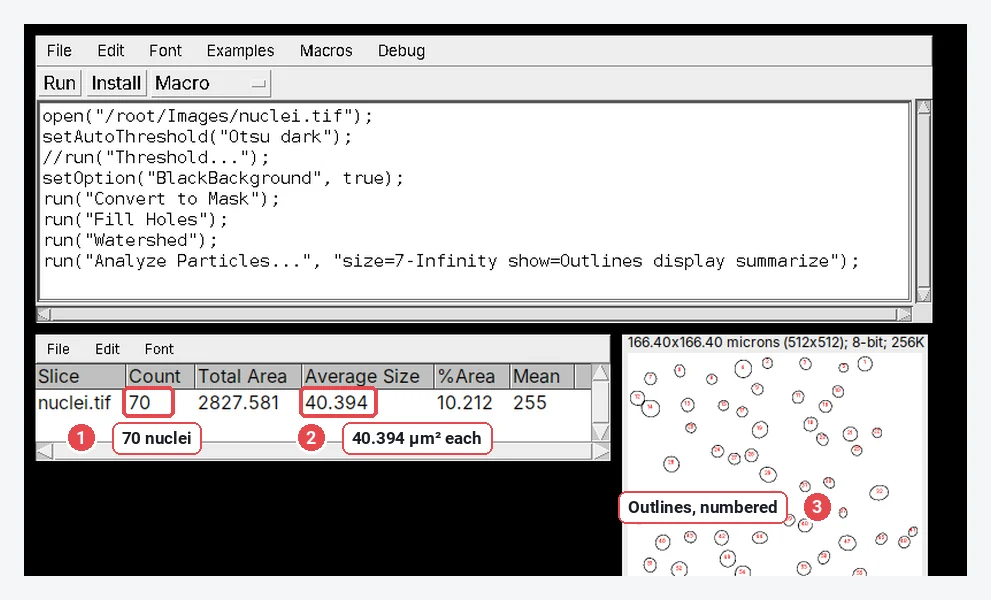
ImageJ counts 70 nuclei. You will see that number again in Step 7.
Step 6: Click Create
Go back to the Recorder. It now holds your whole workflow, one line per step. Click Create. The lines open in the macro editor, a new text window with its own menus.
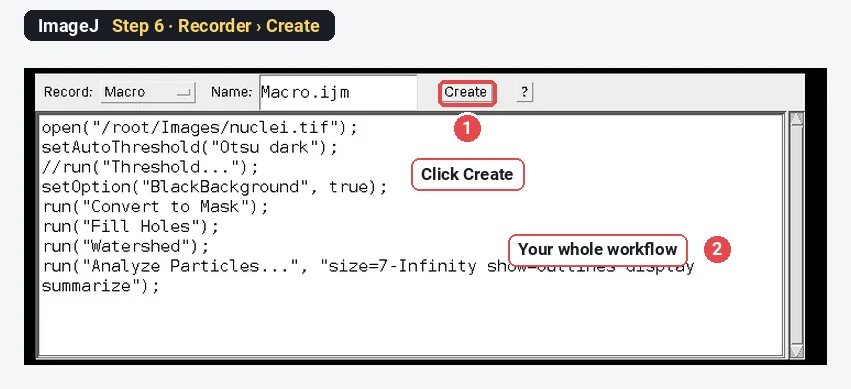
The line //run("Threshold..."); starts with two slashes, so it is a comment: ImageJ skips it. It only reminds you that the Threshold window was open.
Step 7: Run the macro
Close the image and its results, then click Run in the editor (or press Ctrl R). ImageJ opens the file again and repeats every step on its own. Save the macro with File › Save As in the editor; keep the .ijm ending.
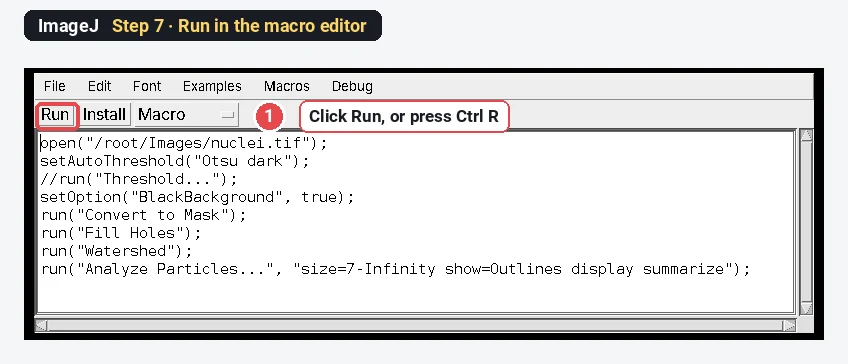
The result is the same as by hand: the Summary table, the Results table and the outline drawing.
The Mean in the Summary is 255 because the macro measured the mask, not the original image. If you need intensities, set Analyze › Set Measurements… › Redirect to the original image before you record Step 5.
The macro, line by line
Here is the recorded macro with a comment on each line. Anything after // is a note for people; ImageJ ignores it.
open("/root/Images/nuclei.tif");        // open one file (fixed path: remove for batch)
setAutoThreshold("Otsu dark");          // Otsu threshold, objects brighter than background
//run("Threshold...");                  // a comment: the Threshold window was open
setOption("BlackBackground", true);     // masks are white objects on black
run("Convert to Mask");                 // apply the threshold: an 8-bit mask
run("Fill Holes");                      // close gaps inside each nucleus
run("Watershed");                       // split touching nuclei
run("Analyze Particles...", "size=7-Infinity show=Outlines display summarize");
                                        // count objects of 7 µm² or more, draw outlines,
                                        // list every object and add a Summary row
To change the analysis, edit the text, not the menus: "size=7-Infinity" to "size=10-Infinity", or "Otsu dark" to "Triangle dark". Settings you leave out of the options string take their default values, so keep everything the Recorder wrote.
Batch-process a folder, step by step
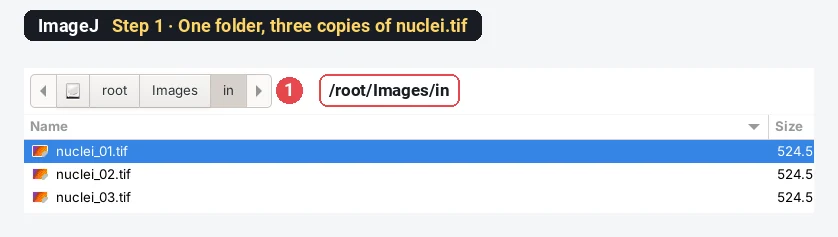
The recorded macro works on one fixed file. Process › Batch › Macro… runs the same lines on every image in a folder without that open() line. We made a folder with three copies of the nuclei sample to try it.
Step 1: Put the images in one folder
Make a folder that holds only the images to analyse (here nuclei_01.tif, nuclei_02.tif and nuclei_03.tif). Make a second, empty folder for the output.
Step 2: Fill in Process › Batch › Macro…
Choose Process › Batch › Macro…. Click Input… and pick the image folder; click Output… and pick the empty folder. Leave Output format on TIFF. Paste the recorded lines into the big text box, without the open() line: Batch opens each file for you.
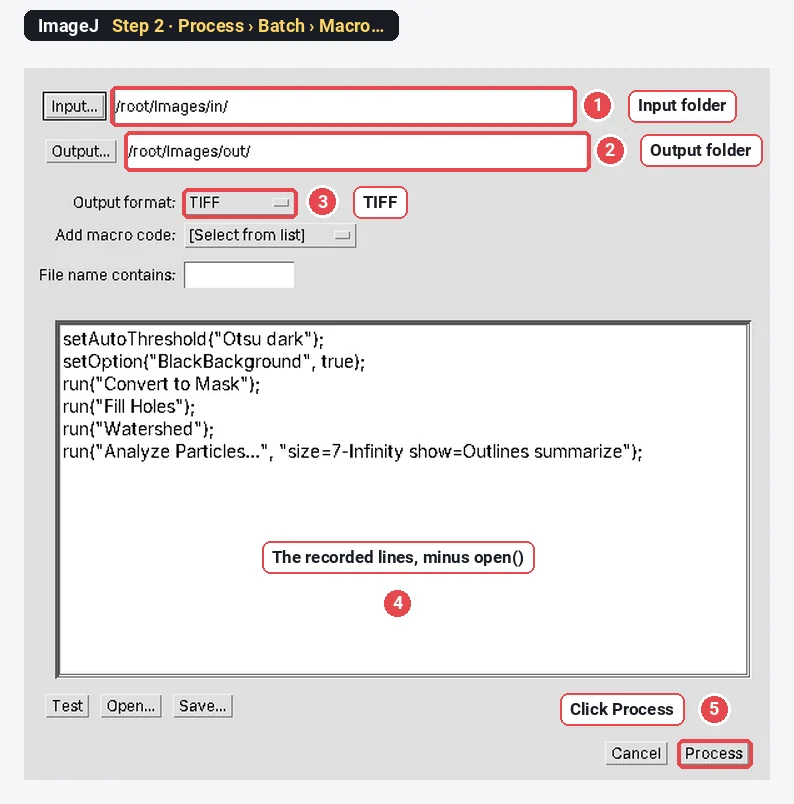
Click Test first if you are unsure: it runs the code on the first image only, so you can check the result before committing to a folder of 500 files.
Step 3: Click Process and read the Summary
Click Process. ImageJ opens each file, runs the lines and saves the result in the output folder. With Show: Outlines, the saved files are the outline drawings. Because the code has summarize in it, the Summary table gets one row per file.
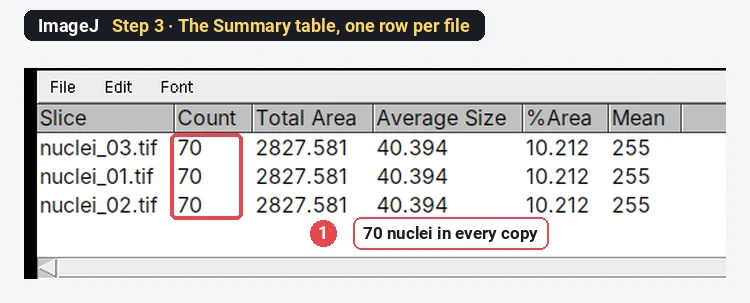
Save it with File › Save As… in the Summary window (a .csv opens in any spreadsheet). On our Linux test the files were processed in the order the system listed them (03, 01, 02), not alphabetically; match rows by the file name in the first column, not by row number.
A folder loop, if you want to go one step further
Batch › Macro is the easy route. The same job as a stand-alone macro uses getFileList() and a for loop. It does not need the Batch dialog, asks for the folder when it starts, and is a good first piece of real macro code to read:
// Count nuclei in every TIFF in a folder
input = getDirectory("Choose the folder of images");   // a folder dialog opens
list = getFileList(input);                              // every file name in it
setBatchMode(true);                                     // work without drawing windows
for (i = 0; i < list.length; i++) {
    if (!endsWith(list[i], ".tif")) continue;           // skip anything that is not a TIFF
    open(input + list[i]);
    setAutoThreshold("Otsu dark");                       // the recorded lines start here
    setOption("BlackBackground", true);
    run("Convert to Mask");
    run("Fill Holes");
    run("Watershed");
    run("Analyze Particles...", "size=7-Infinity summarize");
    close();                                             // close the mask before the next file
}
setBatchMode(false);
Paste it into Plugins › New › Macro, click Run and choose the folder. On our three copies it gave the same Summary as Batch › Macro (70 nuclei each), with the files in alphabetical order.
Pitfalls
- The open() line in Batch. Batch opens each file itself. Leaving open() in makes every pass open the first image again, so every row describes the same file.
- Fixed window titles. A recorded selectWindow("nuclei.tif") breaks on the second file. Use getTitle() to store the title, or the image ID.
- The Threshold window's numbers. The Recorder writes the method (setAutoThreshold("Otsu dark")), not a fixed value. That is usually what you want: each image gets its own Otsu threshold. If you dragged the sliders to a fixed value, the Recorder writes setThreshold(lower, upper) instead, which suits images taken with identical settings only.
- Measuring the mask. Mean, IntDen and other intensity columns refer to the mask (255) unless Set Measurements redirects them to the original image.
- Mixed images in one folder. A different bit depth or pixel size changes what a threshold or a size in µm² means. Check a few files by hand, then batch.
- An output folder that is not empty. Batch overwrites files with the same name. Use a new folder for each run.
Reporting it
Nuclei were counted in [ImageJ 1.54f / Fiji] with a recorded macro applied to every image through Process › Batch › Macro: Otsu threshold (dark background), Fill Holes, Watershed and Analyze Particles (size ≥ 7 µm²). The macro is provided as Supplementary File 1.
Sharing the .ijm file is the best methods description you can give: it states every setting exactly.
Switch to LabCanvas: batch counting without a macro
The same count runs in the browser in LabCanvas Image Analysis, with the settings on screen instead of in code: nothing to install, and no macro language to learn (LabCanvas has none).
- Open an image (or the nuclei sample on the start screen) and go to Count › Count particles. Pick Otsu, tick fill holes and watershed, set the size range, and click Count.
- Open Count › Batch and choose Files… (or run it on every open image). Each file is opened in turn with the same settings.
- Read the Summary: one row per image, and every particle if you ask for them. Send to Graphs plots the counts by image, with statistics.
- For a guided assay (colonies, foci, wound healing and others), Save as workflow keeps its settings under a name and runs them on many files.
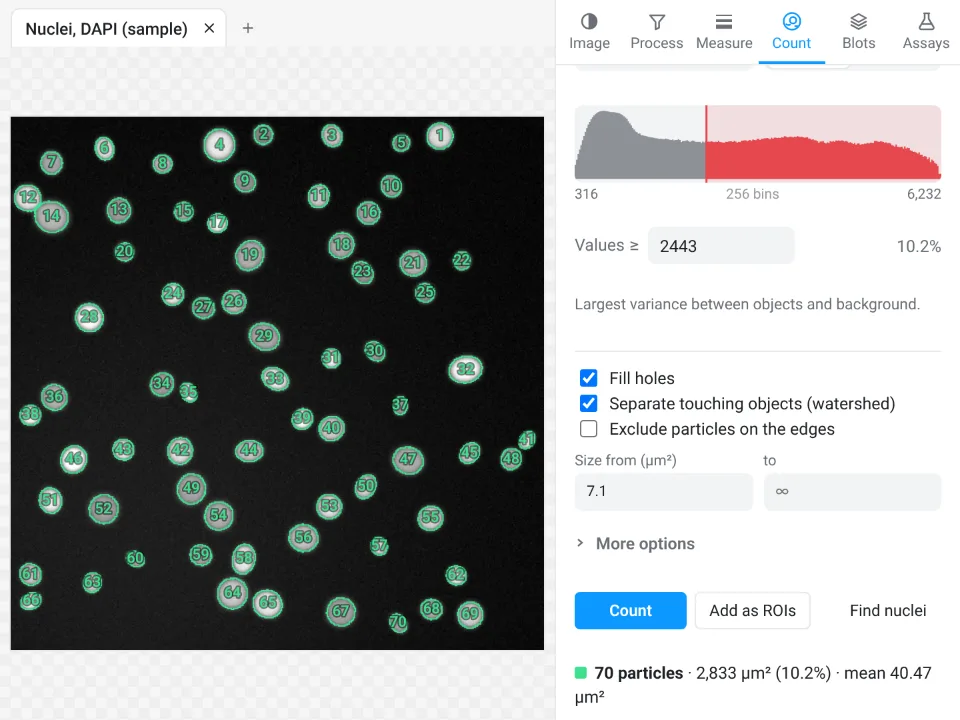
On the same nuclei sample LabCanvas counts the same 70 nuclei; its mean area is 40.47 µm² against ImageJ's 40.394 µm², a difference of 0.2% that comes from how the two outline the edge pixels.
Why switch for this job:
- No code to maintain: the settings sit in the panel, and a saved workflow keeps them under a name.
- An image check flags saturated pixels, JPEG compression and uneven light before a batch silently measures them.
- Results straight to Graphs, with a methods sentence under every table.
What stays better in Fiji: a macro can do anything ImageJ can, in any order, on thousands of files, with plugins in the middle. For complex pipelines, keep the macro.
Open Image Analysis, free with a LabCanvas account (downloading files is part of Pro).
ImageJ and Fiji are independent open-source projects; LabCanvas is not affiliated with them.
References
- Schneider CA, Rasband WS, Eliceiri KW (2012). NIH Image to ImageJ: 25 years of image analysis. Nature Methods 9(7), 671–675. doi:10.1038/nmeth.2089
- Schindelin J, Arganda-Carreras I, Frise E, et al. (2012). Fiji: an open-source platform for biological-image analysis. Nature Methods 9(7), 676–682. doi:10.1038/nmeth.2019
Frequently asked questions
How do I record a macro in ImageJ?
Choose Plugins › Macros › Record…, leave Record set to Macro, then do your work with the normal menus. Each command you run is written into the Recorder window as one line of macro code. When you are done, click Create to open the lines in the macro editor, where Run (Ctrl R) repeats them.
How do I batch process a folder of images in ImageJ?
Put the images in one folder, choose Process › Batch › Macro…, set Input to that folder and Output to an empty folder, paste the recorded lines (without the open() line) into the text box and click Process. ImageJ opens each file, runs the code, saves the result in Output, and any Summary table collects one row per file.
What language are ImageJ macros written in?
The ImageJ macro language (IJM), a small scripting language built into ImageJ. Most lines are run("Command name", "options") calls, which is exactly what the Recorder writes, plus variables, if and for statements and built-in functions such as open(), getFileList() and setAutoThreshold(). Fiji also runs scripts in Python (Jython), Groovy and JavaScript.
Why does my recorded macro not work on other images?
The usual cause is the open() line with one fixed file path, or a window title that only exists for the first image (selectWindow("nuclei.tif")). Remove the open() line when you use Process › Batch › Macro, and use getTitle() or the image ID instead of fixed titles. Also check that the other images have the same bit depth and pixel size.
Where do I save an ImageJ macro?
In the macro editor, File › Save As, with the .ijm extension. To run it later, use Plugins › Macros › Run… or open it and click Run. Saved in the ImageJ (or Fiji) plugins folder with an underscore in its name, for example Count_Nuclei.ijm, it appears in the Plugins menu after a restart.
Is there a way to batch-process images without writing a macro?
Yes. LabCanvas Image Analysis runs the same threshold, watershed and Analyze Particles settings on a whole set of files from Count › Batch, in the browser, with no macro language. See the last section.
Try it in LabCanvas
Every app is free to start in your browser. Create an account and begin.
Start Image Analysis free in your browserKeep reading

ImageJ vs LabCanvas Image Analysis: an honest comparison
ImageJ/Fiji or LabCanvas Image Analysis? Six everyday jobs done in both, six newer ones (macros, vendor files, 3D, StarDist, big images) and which to use.

How to use ImageJ: a beginner's tutorial for the 10 everyday jobs (2026)
How to use ImageJ and Fiji: get started, open an image, then 10 everyday jobs (scale, measure, threshold, count, background, blots) with exact menu paths.

How to set the scale and add a scale bar in ImageJ (with a calibration image to practise on)
Set the scale in ImageJ (Analyze › Set Scale) from a micrometer, scale bar or pixel size, add a scale bar, and practise on a free calibration image.