Use ImageJ from Python with PyImageJ (a gentle start)
Install PyImageJ, start ImageJ from Python with imagej.init, run your ImageJ macro, and get the image as NumPy and the Results table as pandas.
Contents
To use ImageJ from Python, install PyImageJ (mamba create -n pyimagej -c conda-forge pyimagej openjdk=11, or pip install pyimagej with Java and Maven), start ImageJ with ij = imagej.init(), and run your macro with ij.py.run_macro(macro). ij.py.from_java(...) brings images back as NumPy-backed xarrays and the ImageJ Results table back as a pandas DataFrame (Rueden et al. 2022).
The easiest way in is to keep what you already know: write and test a macro in ImageJ, then run that same macro from Python and pick up the numbers there. This guide does exactly that with a nuclei count.
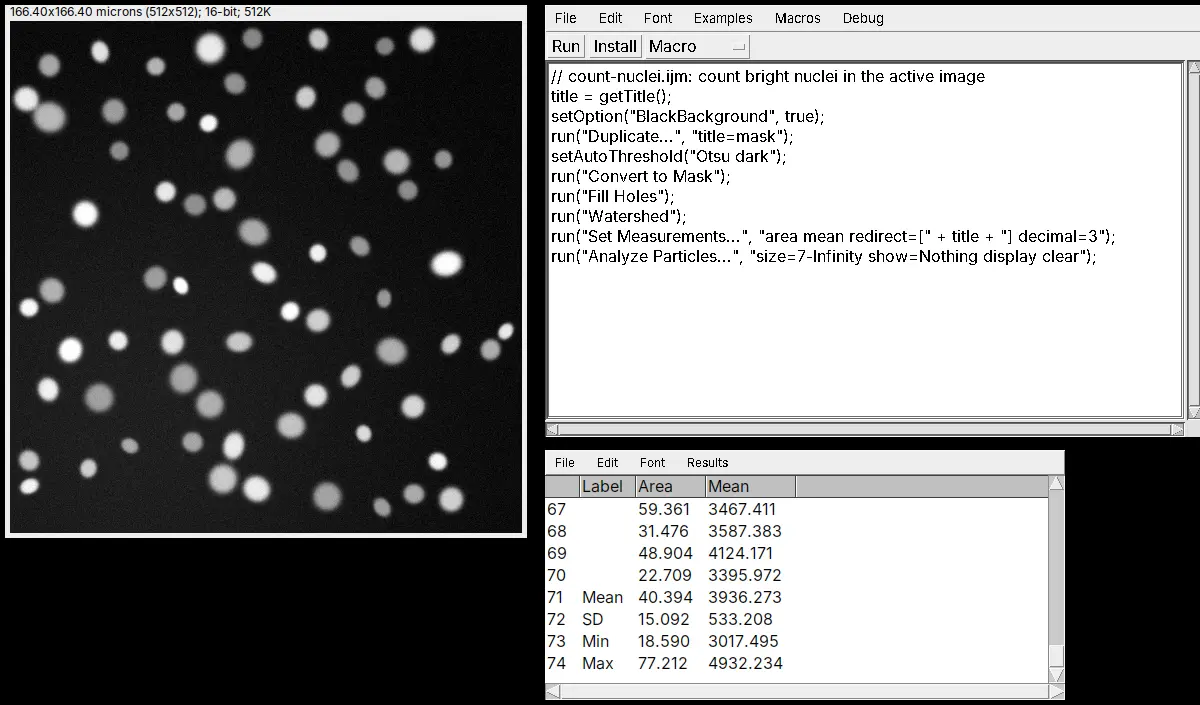
What you need: ImageJ 1.x or Fiji to write and test the macro; Python 3.9 or later with PyImageJ (installed below); an internet connection the first time, because PyImageJ downloads ImageJ2. The example image is the synthetic nuclei sample (512 × 512 pixels, 16-bit, 0.325 µm per pixel, 70 nuclei). Time: 20 minutes, most of it the first download.
The ImageJ steps are shown in ImageJ 1.54f. The Python code follows the PyImageJ documentation and its tests; we could not run it where these screenshots were made, so the numbers it should print are the ones the same macro gave in ImageJ.
What PyImageJ is
PyImageJ is a Python package that starts ImageJ2 inside Python, through Java. You get a gateway, usually called ij, with the whole ImageJ2 and original ImageJ toolbox, plus helpers under ij.py that convert between Java images and Python objects (NumPy, xarray, pandas). The original ImageJ (the "legacy" layer) is included by default; you need it for macros and for ImageJ 1.x plugins.
Write and test the macro in ImageJ first
A macro that works in ImageJ will work from Python. Debugging it in ImageJ, where you can see every window, is much easier.
Step 1: Open the image and the macro
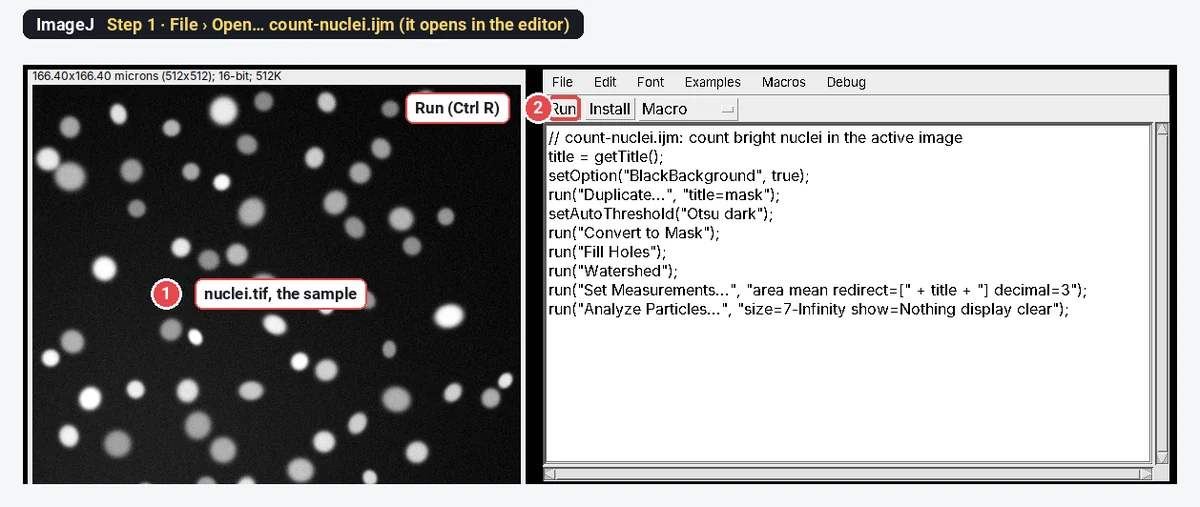
Open the image with File › Open…. Save the macro below as count-nuclei.ijm and open it with File › Open… too: a .ijm file opens in the macro editor. (Or start a new one with Plugins › New › Macro and paste it.)
// count-nuclei.ijm: count bright nuclei in the active image
title = getTitle();
setOption("BlackBackground", true);
run("Duplicate...", "title=mask");
setAutoThreshold("Otsu dark");
run("Convert to Mask");
run("Fill Holes");
run("Watershed");
run("Set Measurements...", "area mean redirect=[" + title + "] decimal=3");
run("Analyze Particles...", "size=7-Infinity show=Nothing display clear");
It makes a mask with an Otsu threshold, fills holes, splits touching nuclei with Watershed, and measures each nucleus (area, and mean intensity on the original image) in the Results table.
Step 2: Run it and check the numbers
Click on the image window, then click Run in the editor. The Results table fills with one row per nucleus. Analyze › Summarize adds the mean, SD, minimum and maximum at the bottom.
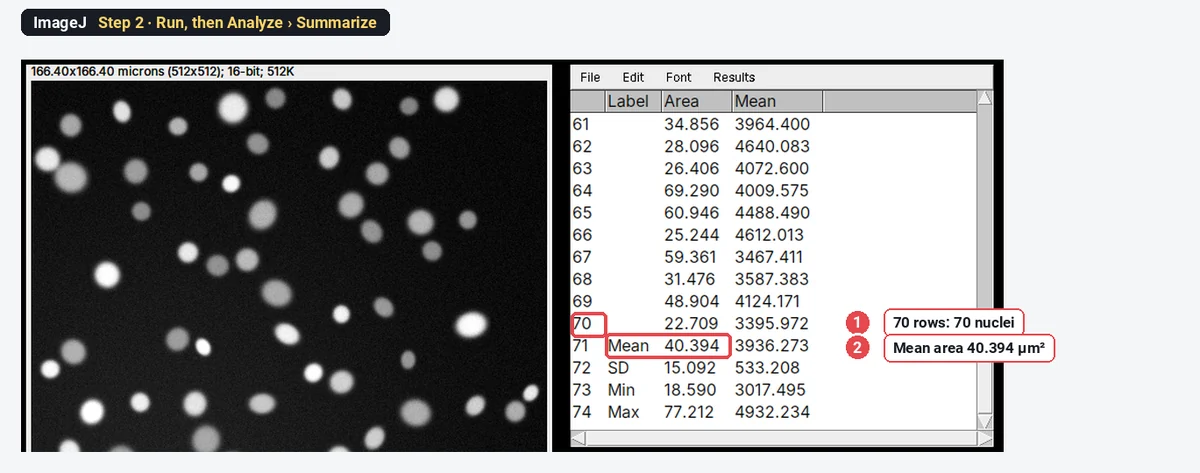
If the count is wrong here, fix the macro here. Python will not make it any better.
How do I install PyImageJ?
With conda or mamba (the simplest, because it brings Java with it):
mamba create -n pyimagej -c conda-forge pyimagej openjdk=11
mamba activate pyimagej(conda works the same way, only slower.)
With pip, inside a virtual environment: install Java (OpenJDK 8, 11 or later) and Maven yourself, make sure mvn runs from the command line, then:
pip install pyimagejTest it:
python -c "import imagej; ij = imagej.init('2.14.0'); print(ij.getVersion())"This prints 2.14.0. The first time takes from about 30 seconds to a few minutes, because it downloads and caches ImageJ2.
Which imagej.init should I use?
imagej.init() decides which ImageJ you get and how it runs.
| You want | Code |
|---|---|
| The newest ImageJ2, with the original ImageJ (for macros) | ij = imagej.init() |
| A fixed version, for reproducible results | ij = imagej.init('2.14.0') |
| Fiji's plugins as well | ij = imagej.init('sc.fiji:fiji') |
| The Fiji you already installed, with its update sites | ij = imagej.init('/Applications/Fiji.app') |
| No original ImageJ (no macros) | ij = imagej.init(add_legacy=False) |
| See the ImageJ window while Python keeps running | ij = imagej.init(mode='interactive'), then ij.ui().showUI() |
| The ImageJ window, Python waits until you close it | ij = imagej.init(mode='gui') |
The default mode is headless: no windows, which is what you want on a server or in a script. Interactive mode does not work from plain Python on macOS (it does in Jupyter or IPython).
To give Java more memory, set it before init:
import imagej, scyjava
scyjava.config.add_option('-Xmx6g')
ij = imagej.init()
Run the macro from Python and get the numbers
Save this as count.py next to count-nuclei.ijm, change the paths, and run python count.py.
import imagej

# Start ImageJ2 with the original ImageJ inside (needed for macros).
ij = imagej.init('2.14.0')

# Open the image with the original ImageJ and make it the active image.
# show() is needed even without windows: macros work on the active image.
imp = ij.IJ.openImage('/path/to/nuclei.tif')
imp.show()

# Run the macro you tested in ImageJ.
with open('/path/to/count-nuclei.ijm') as f:
    macro = f.read()
ij.py.run_macro(macro)

# The Results table as a pandas DataFrame: one row per nucleus.
rt = ij.ResultsTable.getResultsTable()
df = ij.py.from_java(rt)
print(len(df), 'nuclei, mean area', round(df['Area'].mean(), 3))
df.to_csv('nuclei.csv', index=False)
On the sample, the DataFrame should hold the 70 rows of the ImageJ Results table above, with a mean area of 40.394 µm². From here it is ordinary Python: plots with matplotlib, statistics with SciPy, one CSV per image.
To run it on a folder, loop over the files and do the open, run and read steps for each; give each file a fresh Results table (the macro's clear does that) and close the images with ij.IJ.run('Close All') between files.
How do I get the image as a NumPy array?
xarr = ij.py.from_java(imp)   # xarray.DataArray with named dimensions
arr = xarr.values             # a plain NumPy array
print(arr.shape, arr.dtype, arr.mean())
The other way round, a NumPy array goes to ImageJ with ij.py.to_imageplus(arr) (an ImagePlus for the original ImageJ and macros) or ij.py.to_java(arr) (an ImageJ2 image). Watch the order of the axes: Python works in rows, then columns (y, x), ImageJ in x, then y, and the xarray dimension names (row, col, ch, pln) tell you which is which.
If an ImageJ 1.x command changes an ImagePlus that came from a NumPy array, call ij.py.sync_image(imp) before you read the array again, or Python still sees the old pixels.
How do I pass values into a macro and get one back?
Declare inputs with #@ lines and outputs with #@output, then pass a dictionary:
macro = """
#@ int sigma
#@output Object meanValue
run("Gaussian Blur...", "sigma=" + sigma);
getStatistics(area, meanValue);
"""
result = ij.py.run_macro(macro, {'sigma': 2})
print(result.getOutput('meanValue'))
Single ImageJ commands can also be run without a macro: ij.py.run_plugin('Gaussian Blur...', {'sigma': 2}, imp=imp) runs the menu command by its name, as the Macro Recorder (Plugins › Macros › Record…) writes it.
Pitfalls
- Java not found. With pip, PyImageJ needs Java and Maven on the path; set JAVA_HOME if Java is installed but not found. The conda route avoids this.
- The first init is slow. It downloads ImageJ2; later starts use the cache. Pin a version (
imagej.init('2.14.0')) so a new release does not change your results. - No active image. Macros work on the active image. Call
imp.show()first, even headless. - Headless limits. The original ImageJ's RoiManager and WindowManager do not work headless. Use Analyze Particles with the Results table, as above, or start in interactive mode.
- One macro at a time. The macro interpreter is not meant to run macros in parallel; run them one after another.
- Stale pixels. After an ImageJ 1.x command changes an image made from NumPy, call
ij.py.sync_image(imp). - Settings that drift. Keep the macro in one file and load it from Python, rather than keeping two copies that slowly differ.
Reporting it
Images were analysed in Python [3.12] with PyImageJ [1.x] (Rueden et al. 2022) running ImageJ2 [2.14.0] (Rueden et al. 2017) and the ImageJ macro count-nuclei.ijm (Otsu threshold, Fill Holes, Watershed, Analyze Particles, size 7 µm² to infinity; supplied as supplementary file [S1]).
Share the macro and the Python script with the paper; together with the pinned ImageJ2 version, they let anyone repeat the analysis exactly. Cite ImageJ as well (Schneider et al. 2012).
Switch to LabCanvas: the same count without code
If you came to Python only to count many images in the same way, and you do not want to write code, LabCanvas Image Analysis does it in the browser with nothing to install.
- Click Open an image, or the nuclei sample on the start screen.
- In the Count tab, click Find nuclei (Otsu, fill holes, watershed and a sensible minimum size in one click), or set the same steps by hand in Count particles and click Count.
- For many images, use Batch in the same tab: it runs the Count particles settings on every open image or on files you choose, one Summary row per image.
- Send to Graphs for the plot and statistics.
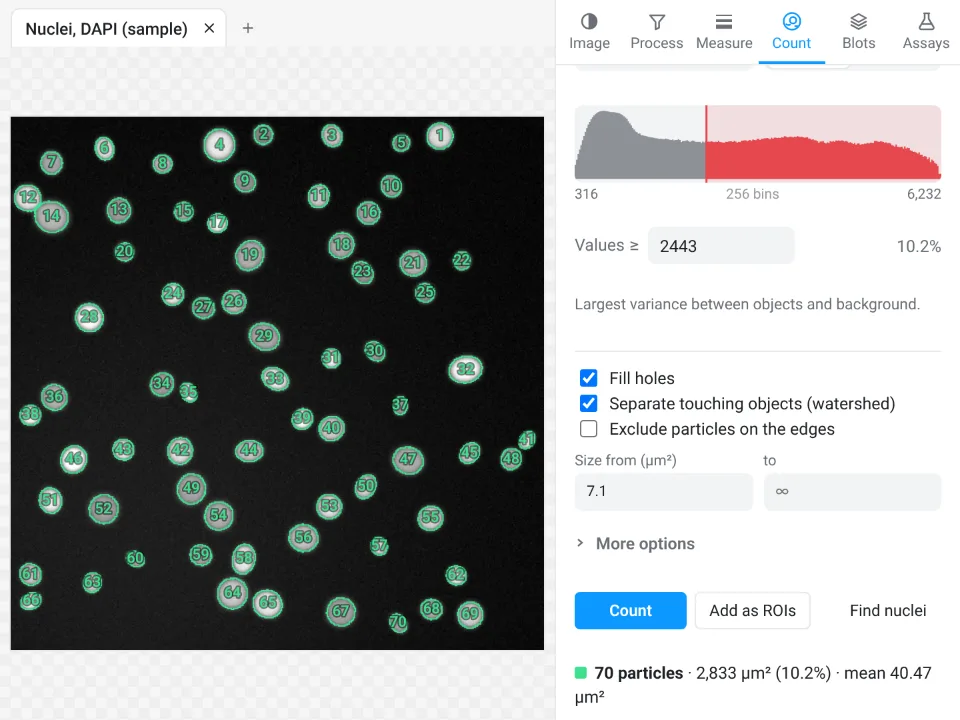
On the same synthetic sample, the ImageJ macro above counts 70 nuclei with a mean area of 40.394 µm²; LabCanvas Find nuclei counts 70, mean area 40.47 µm².
Why switch for this job:
- No code and no install: the steps the macro does are buttons, with ImageJ's names.
- Batch and saved workflows instead of a script, for many images in one table.
- Results straight to Graphs with statistics, and a methods sentence to copy.
PyImageJ stays better when you need ImageJ inside a larger Python pipeline (NumPy, scikit-image, deep learning, a cluster), or Fiji plugins from code.
Open Image Analysis: free with a LabCanvas account (downloading CSV files is part of LabCanvas Pro). ImageJ and Fiji are independent open-source projects; LabCanvas is not affiliated with them.
References
- Rueden CT, Hiner MC, Evans EL, Pinkert MA, Lucas AM, Carpenter AE, Cimini BA, Eliceiri KW (2022). PyImageJ: a library for integrating ImageJ and Python. Nature Methods 19, 1326–1327. doi:10.1038/s41592-022-01655-4
- Rueden CT, Schindelin J, Hiner MC, DeZonia BE, Walter AE, Arena ET, Eliceiri KW (2017). ImageJ2: ImageJ for the next generation of scientific image data. BMC Bioinformatics 18, 529. doi:10.1186/s12859-017-1934-z
- Schneider CA, Rasband WS, Eliceiri KW (2012). NIH Image to ImageJ: 25 years of image analysis. Nature Methods 9, 671–675. doi:10.1038/nmeth.2089
Frequently asked questions
How do I install PyImageJ?
With conda or mamba: mamba create -n pyimagej -c conda-forge pyimagej openjdk=11, then mamba activate pyimagej. With pip: pip install pyimagej, but then you also need Java (OpenJDK 8 or 11 or later) and Maven, with the mvn command on your path. Test it with python -c "import imagej; ij = imagej.init('2.14.0'); print(ij.getVersion())".
Can I run an ImageJ macro from Python?
Yes: ij.py.run_macro(macro_text). Initialise with the original ImageJ included (the default), make the image active first (imp.show() works even headless), and read the results afterwards, for example the Results table with ij.ResultsTable.getResultsTable(). Macro inputs and outputs can be declared with #@ lines and passed as a dictionary.
How do I get an ImageJ image into NumPy?
ij.py.from_java(imp) converts an ImagePlus or a Dataset to an xarray DataArray with labelled dimensions; .values gives the plain NumPy array. The other way, ij.py.to_imageplus(array) or ij.py.to_java(array) hands a NumPy array to ImageJ.
Does PyImageJ need Fiji installed?
No. imagej.init() downloads ImageJ2 on the first run and caches it. Use imagej.init('sc.fiji:fiji') to get Fiji's plugins, or imagej.init('/path/to/Fiji.app') to use a Fiji you already have, with its update sites.
Why does PyImageJ not show a window?
The default mode is headless, with no user interface. Use imagej.init(mode='interactive') and ij.ui().showUI() to see ImageJ while you work from Python (in Jupyter or IPython on macOS), or mode='gui', which blocks Python until you close ImageJ.
Is there a way to batch-measure images without code?
In ImageJ, Process › Batch › Macro runs a macro on a folder. In LabCanvas Image Analysis, the Count tab has a Batch section and the guided assays can be saved as workflows that run on many files, with no code at all.
Try it in LabCanvas
Every app is free to start in your browser. Create an account and begin.
Start Image Analysis free in your browserKeep reading

ImageJ vs LabCanvas Image Analysis: an honest comparison
ImageJ/Fiji or LabCanvas Image Analysis? Six everyday jobs done in both, six newer ones (macros, vendor files, 3D, StarDist, big images) and which to use.

How to use ImageJ: a beginner's tutorial for the 10 everyday jobs (2026)
How to use ImageJ and Fiji: get started, open an image, then 10 everyday jobs (scale, measure, threshold, count, background, blots) with exact menu paths.

How to set the scale and add a scale bar in ImageJ (with a calibration image to practise on)
Set the scale in ImageJ (Analyze › Set Scale) from a micrometer, scale bar or pixel size, add a scale bar, and practise on a free calibration image.